by Mike Jahrig KG5P
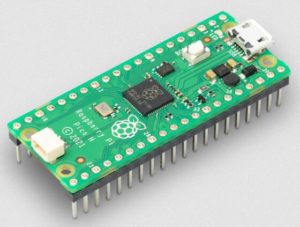
Last month in the Chawed Rag, I demonstrated how to use a Raspberry Pi Pico-W as a HTML web server. I demonstrated how to setup a basic web framework that receives the temperature from the builtin sensor and displays it on the client. I also demonstrated how the client can send data back to the Pico server . The HTML running on the client used HTML buttons to turn on and off an LED connected to a Pico GPIO pin and the built-in LED.
You could argue, and you would be correct, that this application has little, if any, practical value. But it I must disagree; it demonstrated proof-of-concept. You could also argue these functions are trivial, and perhaps useless. And again, you would be correct. But in reply, I say, if you can do this, you can do anything else. You simply use the basic framework I provided and add some sensors. With the sensors, and there are hundreds available, you can monitor and process all sorts of external events and control external processes. Data is data. The Pico doesn’t care where the data comes from or what is done with it. It is up to us as programmers to tell it what to do with the data supplied by the sensors.
The sensor demonstrate today is the Bosch BME-380 temperature, pressure, and humidity sensor. There is also a BMP-380 sensor that does not output humidity. In my testing I found that is the only difference between the two sensors.
After rooting through my parts junk box, I located three BMP-280 sensors but no BME-280s. Looking at Ebay I found plenty of Chinese BMPs for a couple of bucks including shipping, and a few BMEs that cost several times as much. I bought a BME-280 for about 8 bucks plus about $5 shipping from a US seller. I am using the BME-280 in this discussion to print humidity.
So what you really must decide is how important humidity reading are and if you wish to pay extra for the BME-280.
My project goal is to build a weather station for RACES. RACES is not interested in humidity. They also are neither interested in temperature nor barometric pressure, for that matter. But my weather station is a work-in-progress and RACES indeed is interested in rainfall and wind speed. I will add a rain gauge and anemometer to my project later. Stay tuned.
As I said, humidity is not one of the minimum reporting criteria for RACES, but it is important to me. If I know humidity and temperature, I can determine dew point. As a ham but also an amateur astronomer, I care a lot about dew point. I want to know the dew point so I can shut down my equipment during observing sessions before it becomes covered with dew.
Because, if I know both the temperature and humidity, I can calculate the approximate dew point value. These calculations are somewhat involved mathematically and involve natural logarithms, but can easily be performed by Python. I will publish the code when I write and test it.
As mentioned above, for humidity readings, you will need the more expensive (by a few bucks) BME-280. If you don’t care about relative humidity or dew point, buy the cheaper BMP-280.
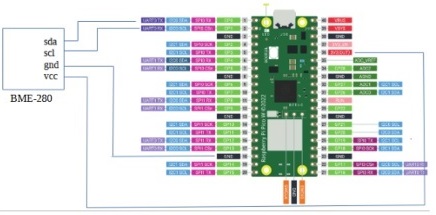
Take out your breadboard and wire up this circuit using the Pico and the BMP/BME-280. If your BMP has 6 pins, that’s ok. If it has 6, it has the capability to use STI as well as I2C. Since we are not using STI, we will not use the CSB and SDO pins.
Next, fire up Thonny and copy and paste the source code in the code window. Note the comments in the code and make any adjustments. Get the source code here: Link to BME-280.py
Now, add the BMP/BME sensor library to the Pico. I assume you already loaded the Pico firmware as was discussed in the October 2022 Chawed Rag so I won’t repeat it. This being said, all you have to do is add the sensor specific libraries, objects, methods, and classes to Thonny. Then when you push down the interpreted code to the Pico, it will have all the hardware support pieces and parts it needs.
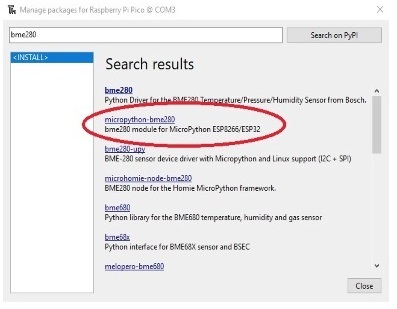
On the Thonny toolbar, select Tools ==> Manage Packages. A screen like figure 2 will open. In the search window, type bme280 and press the Search on PyPI button. In Search results select micropython-bme280 and press enter. You will see a screen pop up titled micropython-bme280. Press the install button at the bottom. This will install the library modules. Then press close.
Run the script in the Thonny main window. You will see the results printed in the shell window like this:
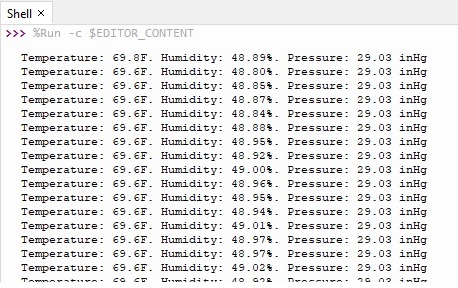
The script will go into a while loop and print a line and sleep for 10 seconds, then print another.
What’s next? Next time I will combine this Python script with the web server script I presented last month. After that we will add more sensors to make this a real weather station.