
by Mike Jahrig KG5P
Have you wondered what a Raspberry Pi Pico W is? It’s a small microcontroller that allows you to do very small repetitive tasks – it’s really nothing like a traditional Raspberry Pi, but it is suited for quite a bit of small projects and you should know how to use one. This month I will show you how to set up a simple web server to retrieve and post information from the Pico W to a web page.
At this writing the Picos are in stock at Microcenter for 7 bucks. Well, maybe not. In fact they are about the only Raspberry products available in the US and Europe unless you want to pay outrageous prices.
You can program the Pico using various languages, BASIC, C++ or Micropython. I will use Micropython in this project. Micropython is a version of Python designed for use with microcontrollers or embedded hardware like the Pico. It contains its own set of support libraries and modules.
Today we will install the firmware and my favorite IDE, Thonny.
Download and install Thonny here. As usual, please read the introduction about Thonny. Scroll to the top of the page and install the version for your PC, Windows, Mac, or Linux. My current version of Thonny is 4.0.1. The Thonny installer will also install Python 3.10 used for PCs, but we will use Micropython which we will install later on the Pico. If you’ve never used this IDE before, take a few minutes and walk through the tutorial.
After you install the Thonny IDE, it’s time to flash the Pico with the Micropython firmware.
First, navigate to this link to see how to install the firmware, the uf2 file. Make sure you pick the Raspberry Pi Pico W version.
Next, download the Pico W firmware from Micropython by clicking on this link. Find the latest nightly build. It looks something like this: v1.19.1-469-g95c614e2b (2022-10-04) .uf2. You can also you download it from the Raspberry Pi website, but it may have “unstable” in the name. Go ahead and use it anyway. It’s the same module
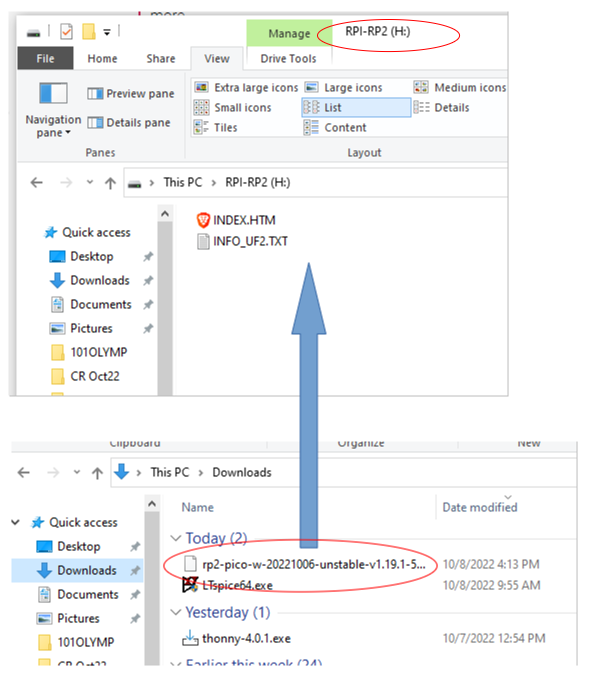
Finally copy the downloaded uf2 file to your Pico as is described on the web site and below.
- Push and hold the BOOTSEL button and plug your Pico into the USB port of your Raspberry Pi or other computer. Release the BOOTSEL button after your Pico is connected.
- It will mount as a Mass Storage Device called RPI-RP2. Windows explorer will open and you will see 2 files, INDEX.HTML and INFO_UF2.TXT.
- Copy the MicroPython uf2 file from wherever you downloaded it the RPI-RP2 volume. Your Pico will reboot. The RPI-RP2 volume will disappear the explorer will close. You are now ready to run MicroPython.
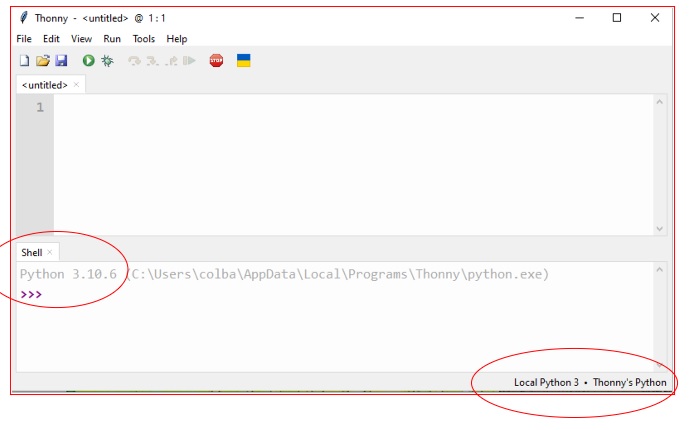
Start up Thonny it you haven’t already. The Thonny shell displays the current Python interpreter for Windows, Local Python 3. We want to install Micropython for Raspberry Pi Pico.
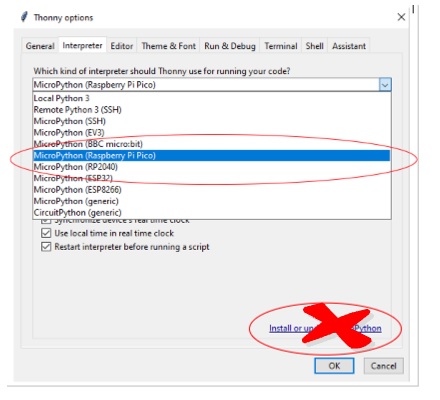
Locate the interpreter you want in the dropdown. Select the MicroPython Raspberry Pi Pico interpreter. Do not click on the Install or update Micropython link. At this time Thonny only installs the non-W firmware and you have already installed the Pico W version earlier.
Thonny is now ready to run Micropython If you want to learn more, go back to the Thonny.org website.
Try typing a command into the shell.
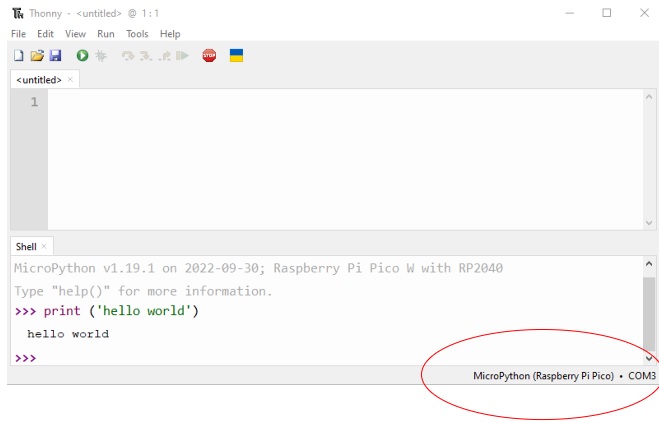
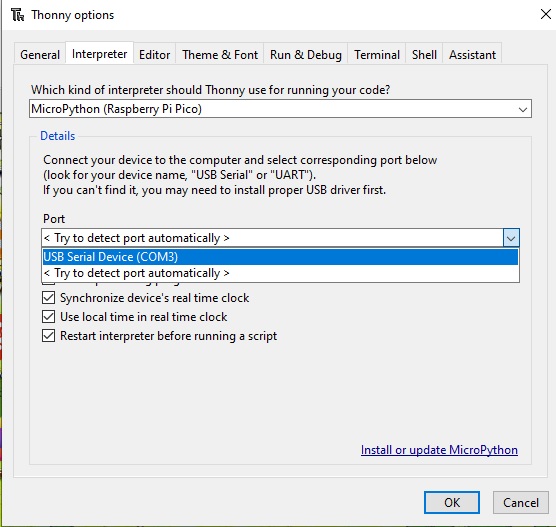
You may find that Thonny cannot connect to a com port. If this happens open Device Manager and see if one is available. You may have to fiddle a bit with this. Try unplugging and plugging back your Pico.
At this point you should have Thonny up and running on the Pico. It’s time to make it a web server. All you have to do is copy the code at the bottom of this article and paste it into the top Thonny window and run it.
First we will run it using the onboard LED. Go into the code and update it with your network’s SSID and password. Click the green go button in the Thonny tool bar.
You should see it trying to build the socket and connecting in the shell.
Waiting for connection…
Waiting for connection…
Waiting for connection…
Waiting for connection…
Waiting for connection…
Connected on 192.168.1.150
The IP address my router assigned me is 192.168.1.150. Your mileage will vary.
Copy the IP address and paste it into your browser’s address bar. The web page will load. Click the buttons and see what happens.

If you get a run-time error after the Pico has built your socket, you may get a message looking something like this:
PROBLEM IN THONNY’S BACK-END: Internal error (serial.serialutil.SerialException: WriteFile failed (PermissionError(13, ‘The device does not recognize the command.’, None, 22))).
See Thonny’s backend.log for more info.
You may need to press “Stop/Restart” or hard-reset your MicroPython device and try again.
Process ended with exit code None.
Couldn’t find the device automatically.
Check the connection (making sure the device is not in bootloader mode) or choose
“Configure interpreter” in the interpreter menu (bottom-right corner of the window)
to select specific port or another interpreter.
You may have to debug any error messages and to restart, you will have to “kill” the “backend” web connection by clicking on the stop sign icon on the Thonny toolbar.
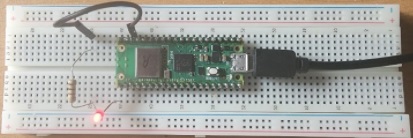
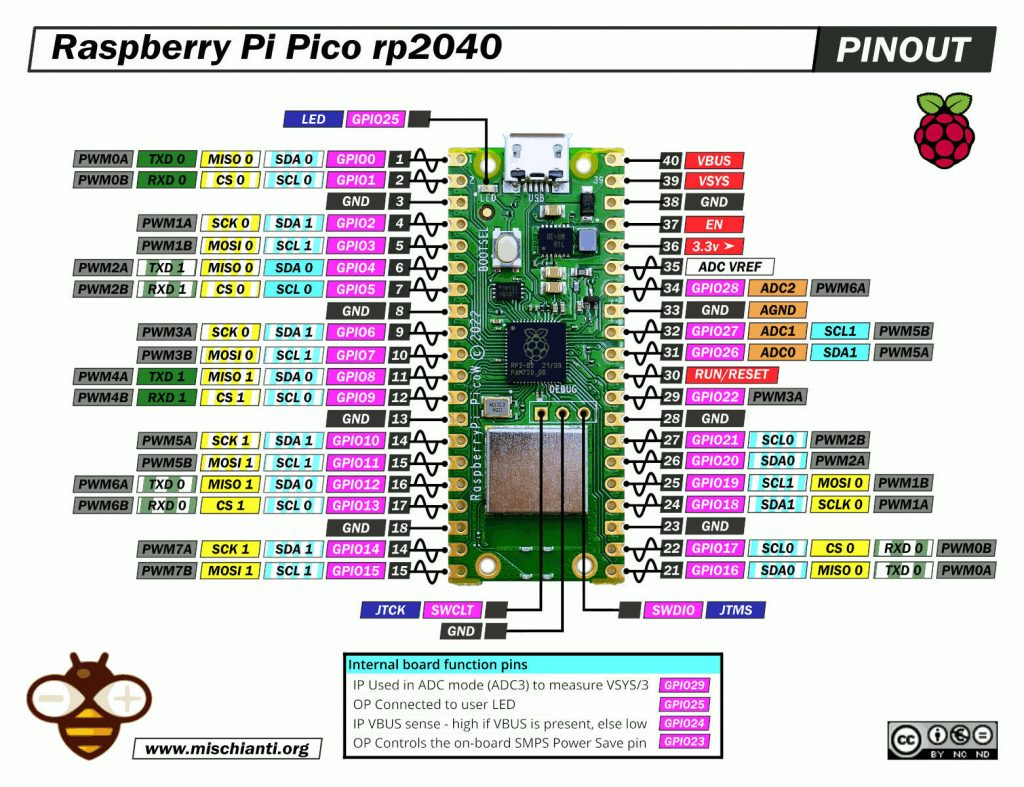
Now update the program to control an outboard LED. See the Pico W Pinout .
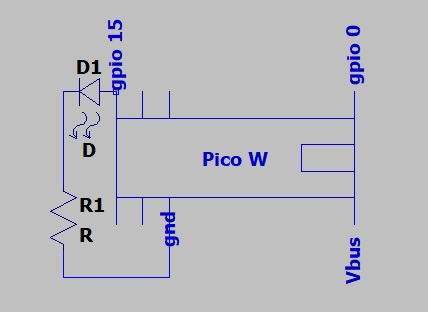
Breadboard up the circuit above. Attach the LED anode (the long lead) to gpio pin 15. Use about a 100 ohm resistor for R1. Next, go into the Thonny code and comment out or delete the led_pin = ‘LED’ instruction on line 21 and uncomment the instruction
##led_pin = 15 on line 22. You should now be able to turn the outboard LED on and off from the web page.
Next time we will start with what we have here and add some weather station components.
#*********************************************************
# Python code to run web server
#*********************************************************
#*********************************************************
# Basic Housekeeping
#*********************************************************
import network
import socket
from time import sleep
import machine
#*********************************************************
# Define external led use gpio pin 15
# or onboard led
#*********************************************************
##uncomment led_pin for onboard LED or outboard gpio pin 15
led_pin = ‘LED’ ## onboard LED
##led_pin = 15 ## external LED
led = machine.Pin(led_pin, machine.Pin.OUT)
#*********************************************************
# Put your ssid and password here
#*********************************************************
ssid = ‘your ssid’
password = ‘your password’
#*********************************************************
# Define the analog pin for the onboard thermometer so we
# can later convert it to a digital value based on the
# analog voltage it returns.
#*********************************************************
sensor_temp = machine.ADC(4)
conversion_factor = 3.3 / (65535)
#*********************************************************
# Here we connect to your wifi network so we can
# control the onboard LED. Connect to the WLAN . The
# wlan object is set up here to activate it.
# Then go into a sleep loop and wait until it connects.
# At that point it prints the ip address that you will
# connect to in your browser.
#*********************************************************
def connect():
#Connect to WLAN
wlan = network.WLAN(network.STA_IF)
wlan.active(True)
wlan.connect(ssid, password)
while wlan.isconnected() == False:
print(‘Waiting for connection…’)
sleep(1)
ip = wlan.ifconfig()[0]
print(f’Connected on {ip}’)
return ip
#*********************************************************
# At this point we create a socket. This will connect
# your pico W with a browser on the same network using
# the IP address just displayed.
# The information on the web page will be sent to the
# server, your pico W from the client or web browser
# running on another computer.
#
#*********************************************************
def open_socket(ip):
# Open a socket
address = (ip, 80)
connection = socket.socket()
connection.bind(address)
connection.listen(1)
return connection
#*********************************************************
# I created a sample web page using inline html.
# This method is not as versatile as an html file and you don’t
# options here as in a file
# The web page has some buttons to turn the led on and
# off. It also displays the temperature reading from the
# Pico’s on-board temperature sensor.
# The code below forms the connections from the variables
# in this program to the web page. It uses “fstrings”
# to define placeholders for temperature and state
# variables.
#*********************************************************
def webpage(ftemp, ctemp, state):
#Template HTML
html = f”””
<!DOCTYPE html>
<html>
<form action=”./lighton”>
<input type=”submit” value=”Light on” />
</form>
<form action=”./lightoff”>
<input type=”submit” value=”Light off” />
</form>
<p>LED is {state}</p>
<p>Temperature is {ftemp}F, {ctemp}C</p>
</body>
</html>
“””
return str(html)
#*********************************************************
# Now time to serve up our connection. We want to start
# our Pico W webserver so our browser client can connect
# to it. That way we can control the led and read the
# temp. When you first ask for connectivity from your
# browser, the Pico has to accept it. The information
# is sent from the browser to the pico, usually in 1k
# blocks, 1024 bytes.
#
# Note the request.split command below. The stuff
# returned by request contains the light control info
# In it are the /lighton and /lightoff
# directives. The split method splits the long string
# into a list that can parsed. (In this case it fetches
# item 1 relative 0 in the list, /lighton or /lightoff)
#*********************************************************
def serve(connection):
#Start a web server
state = ‘OFF’
led.off()
while True:
client = connection.accept()[0]
request = client.recv(1024)
request = str(request)
try:
request = request.split()[1]
except IndexError:
pass
if request == ‘/lighton?’:
led.on()
state = ‘ON’
elif request ==’/lightoff?’:
led.off()
state = ‘OFF’
reading = sensor_temp.read_u16() * conversion_factor ## convert the analog temp to digital voltage
temperature = 27 – (reading – 0.706)/0.001721 ## and to degrees C
ctemp = int(temperature) ## This is how to obtain the C temp
ftemp = int(9/5 * temperature + 32) ## and C to F for us
html = webpage(ftemp,ctemp,state) ## Display on web page
client.send(html)
client.close()
try:
ip = connect()
connection = open_socket(ip)
serve(connection)
except KeyboardInterrupt:
machine.reset()

