by Mike Jahrig KG5P
This month I’d like to talk about the so-called “Pi-beater” I’m not sure where the term originated, but it was probably by an RWK member on the RWK groups.io blog.
In case you have been living in an alternate universe, a Pi-beater is a laptop more obtainable and in some cases a less expensive alternative to a Raspberry Pi. The Pi-beater laptops usually come equipped with some version of the Windows operating system, Win 10 or 11. The they are full featured and are less total cost than the Pi because don’t need additional equipment such as mice, keyboards, displays, and power supplies.
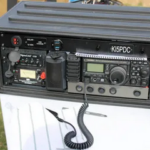
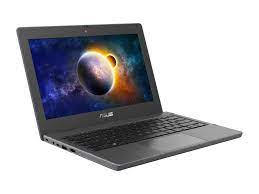
Several types have sold at Microcenter, often at reduced prices. The first was the 128 GB Maestro Evolve III. Another is the Asus BR1100C, which is my subject today. It has a small form factor but its screen is still larger than most tablets and can store a lot more stuff. The ASUS also has a USB-C power connector. On the downside, it only has an Intel 2-core N4500 processor running a 1.1 G clock so it’s not what you might call a screaming number cruncher in any sense. If you want to run any graphic-intense games, forget it. The only games I play are chess and backgammon, and they work fine. But what do you want for $100? It does everything I bought it to do.
Although the description on the MicroCenter website said it was supposed to have Windows 10, mine turned out to have a Windows 11 installation, which was perfectly fine for me. Some want to downgrade to Windows 10 but I think Microsoft will stop support of Windows 10 in 2025.
I increased the storage on my 128 GB eMMC Asus by installing a 512 GB SSD. Since I also like Linux, I installed Lubuntu Linux on a separate partition of the SSD so I could dual boot into either Windows 11 or Lubuntu. If you want to make the Asus a dual-boot machine, it’s a good idea to crack open your Asus and install an additional SSD drive. Mine is a Kingston 512 GB m.2 2280 NVMe. Here is an easy YouTube from Asus that shows the installation procedure:
Now fire it up as a sanity check. Go into Device Management (add/remove partitions) and you should see your new SSD drive. Once you have the SSD installed, you have a couple of choices:
- You can leave the Windows installation that came with the Asus alone. It already has everything you need for a good Windows installation for that machine. The only down side is that the built-in eMMC SSD memory is a bit slower and smaller than the SSD you added. If that’s OK, you can proceed to load Linux on your new SSD.
- You can wipe the existing Windows installation from the eMMC and move both OS installations to the new SSD. It will be a bit faster and you will have more flexibility, but you will have to reload Windows + all the machine specific drivers and also load your flavor of Linux. It’s a lot more complex and not recommended for first-timers.
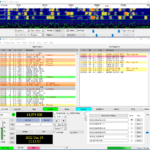
I really like the Linux OS, specifically Lubuntu (the lite version of Ubuntu.) If you want, you can install Linux by itself. You don’t even have to install Windows. I decided to install both but wanted to leave twice as much space on my 512 GB drive for Linux since I want to store a lot of movies on the Linux partition. If you want to install Linux, then download your favorite Linux flavor .iso file and use Balena Etcher to make a bootable USB dongle. Now go back and boot from the Linux dongle through the Asus boot loader. This may cause some problems especially if you have a Windows 11 capable machine. The problem involves the UEFI secure boot mode and the TPM found in Windows 11 ready machines. It doesn’t matter if you are running Windows 10. The machine only has to be capable of running Windows 11. So if you want to dual boot and load Linux, you might have to make BIOS setting changes to install it.
Now you can partition your SSD and use it for additional Windows disk space, or you can install another OS like Linux. You will have to decide how much you want for each logical partition. Just plug in your OS bootable USB stick and go from there. I won’t go into the operating system install process because it is pretty straight forward if you just follow the instructions.
Here are a few more notes before I QRT. The reason I like this machine is I like to watch movies. This is my movie machine. I’ve download lots of videos, primarily the cheesy 50’s SCI-FI ones and I can store hundreds on the 500GB SSD and more on the existing 128GB eMMC. It has a small form factor and it packs up easily in a small carry on, but its screen is still larger than most tablets. Remember if in you reboot from Linux to Windows, be sure to resync your clock.